Under the Hood of an Echoplex With a Shade Tree Mechanic
03/16/2018
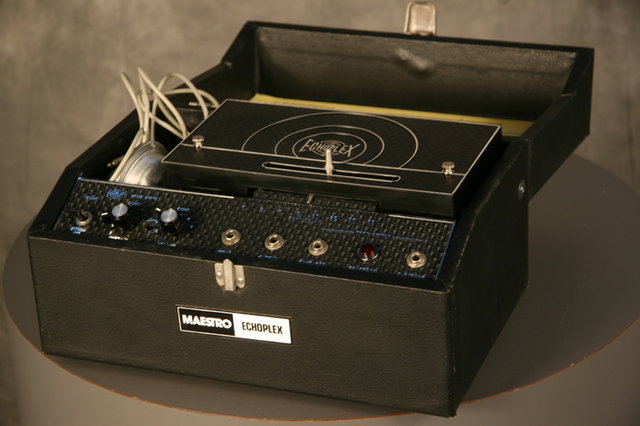
I’ve owned one Echoplex or another for, well, about half my life. You remember the Echoplex: that electro-mechanical marvel that was the main electric guitar echo device for years. I got my first one right about the time I began approaching my career, recording engineering. Cleaning heads, demagnetizing, etc., were all just a part of my life at the time. Since then I’ve had my ‘Plexes apart more times than I can count for updates, maintenance, etc., but this is the first time I’ve undertaken replacing the belt on one. It’s a slightly bigger job, and I'd hardly call myself a professional Echoplex repairman.
Now, mind you, it was absolutely due. This unit, a 1977 EP-3, probably hadn’t had a major service in its life. When I bought it in 2010, this ‘Plex looked as if it had been used for a couple of hours after it was built and then was relegated to a closet for the duration. That’s thirty-three years! And now it is over forty years old. The unit was cosmetically as clean as a whistle. But despite its looks, a few days ago the transport began slowing down and eventually wouldn’t start up at all.
When I turned over the case and turned on the unit I could see through the vent hole that the fan attached to the bottom of the motor shaft was spinning merrily. But, as we’ve established, the capstan, the shaft that drives the tape, wasn’t moving at all. Let's see: motor is running, capstan is still. I pretty much knew what that meant: the belt that runs between the motor pulley and the flywheel was either broken or so loose it allowed the motor to spin freely while the flywheel was still. I ordered a couple of belts from a seller on eBay and waited for their arrival.

Once the belts arrived it was time for the deep dive. I set up a work area with a cork pad to go under the chassis and a cloth behind it to receive the case. As I began disassembly it occurred to me once again how spoiled we are in this modern day-and-age: Using my power screwdriver, I backed out all the case screws and reminisced over my many years of using a manual screwdriver to slowly remove all those long screws. It used to take forever. With the power screwdriver, the screws and the chassis were out in about two minutes flat. Time for the once-around inspection. I found that the belt was in place over the grooves in the edge of the flywheel and the motor pulley. It was clearly belt replacement time.
The drive belt is captive because there are shafts on each side of the flywheel that reach into bearings that are anchored in the motor deck and the transport deck. Those two decks are spaced about an inch apart by standoffs to give space for the pulley and flywheel. The only way to replace the belt is to free up the motor deck enough to lift the lower shaft of the flywheel out of the lower bearing cup. That adds up to removing the screws on the deck and another one on an extension plate that secures the front chassis panel. To get access to that screw requires loosening the preamp card from the front panel, directly beneath the control panel.

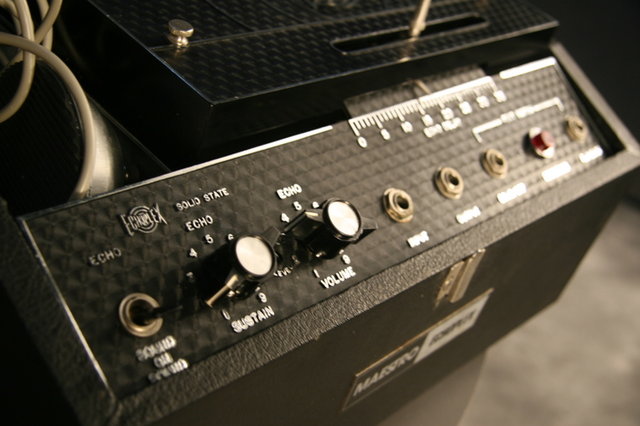
Courtesy whinylittlerunt on Gearslutz
Motor deck is the lower one in this pic
Once the deck was freed up, removing the old belt was a simple matter of freeing the flywheel from the bearing cup, slipping the belt over the lower shaft of the flywheel and off the motor pulley, and pulling it out. That was the simplest job of the bunch. Over time the belt had expanded to the point where it was about an inch longer than it should have been. Well that’s why we replace ‘em, eh? Now, getting the new belt on was going to be a far more complicated job. I left the motor deck attached to one standoff so that the assembly could be kept somewhat together, though the geometry of all the components was flexible. I needed a little of that flexibility to allow the new, tighter belt to be stretched over the pulley and flywheel.
However, nothing, and I mean nothing, in the entire transmission, was rigid once the deck was disconnected. Every little movement of your fingers in the narrow gap between the two decks caused the flywheel or the motor pulley to lean out of the plain that the belt is supposed to occupy, causing the belt to slip around and off. It was like trying to nail jello onto a specific spot on a moving wall of oatmeal. You get the belt over the drive pulley over here and begin to work it onto the flywheel over there. Suddenly, the drive pulley shifts and the belt comes off. Back to square one. Or, you work the belt onto the flywheel over here and start to stretch it onto the pulley over there and the flywheel shifts. Boing! Meanwhile you are trying to negotiate the belt onto the flywheel within the tiny little space between it and the one attached standoff. It all proceeds like an episode of the keystone cops. Back and forth and back and forth. Did I mention that every edge and corner on the chassis is razor sharp? No wonder the pros charge what they do to refurbish one of these machines!

Eventually, through a process of elimination and the slow alignment of the planets, it all came together. The belt slipped on, the lower shaft went back in its bearing cup, and holding my breath, I was able to secure the motor board without popping the belt back off. I buttoned up the rest of the chassis and plugged her up for a test. Voila’! The drive functioned smoothly. Next, I put the transport back in the case and secured it with the case screws. Even that was harder than it had to be because the silly chassis was small enough to shift around and keep its screw holes from lining up with those of the case. Nevertheless, I got things buttoned up. Time for another function check. Nothing. The capstan didn’t spin. I took it back out of the case and set it on my lap. It worked. Okay, I looked for something that could be touching or being pulled out of shape by the case screws. Nothing. I put it back in the case and secured it. This time it worked so I took it into my home studio for a test. It ran erratically with squirrely echoes trailing up and down in pitch. I took it out of the case again and onto my lap and tried it again. This time it behaved just as it had when it was first in the case – I could see the motor move a little as it tried to spin up the flywheel but it couldn’t quite make it happen.
Ah-hah! I fished out a lightweight, penetrating machine oil from my kit and oiled the flywheel bearings. When I plugged in the raw chassis and tried again, Bang! The unit spun right up. I managed to get a minor shock as well, telling me the unit wasn’t willing to give up easily. It finally worked both in and out of the case, so we had a winner. All that was left was wiping up the excess oil, securing the transport cover, and putting away the tools. But once I got the job finished and the tools put away, I spied a stray nut lying on the work surface. I knew exactly where it came from – the preamp circuit board I’d freed up in order to get access to a motor deck screw. Out came the tools and chassis once again and I ran the nut down with a nut driver to hold the corner of the circuit board. Voila’! I buttoned her up and checked everything out and it was finally time to enjoy the rejuvenated Echoplex. And enjoy it I did!
What I didn’t tell you was that with all my fiddling and mucking about the process took two-and-a-half hours, with me leaning over the chassis in odd positions, peering intently, and straining to accomplish the task. Next morning I woke up with a sore back and aches and pains “in places I didn’t know I had places.” I suppose it’s all a part of the job. With the right attitude, the little pains end up feeling like the tactile confirmations of success.

Learn more about Echoplex history, theory of operation, maintenance, and my experiences with it since 1978, HERE.
= =
=