Anatomy of a Recording: The Smile in Her Eyes
09/06/2017
For our anniversary this year I decided to write and record a song for my lovely wife, Ruth. When it came time to record it I wanted it to be as high quality as possible so she’d have a real professional song to listen to and share. Since this was a ground-up production, perhaps a discussion of how I went about assembling the song in the studio can serve as a great tutorial, going over the “first this, then this” stuff as well sharing some interesting recording and mixing techniques I’ve developed over years of solo recording. I wrote this song during a lull in recording, sitting in the control room with an acoustic guitar in my lap and a legal pad and pencil on the console's elbow pad in front of me. Once I had the words and music down I revisited in my spare time for a few days, refining the words and music and rehearsing it. Then I played the song to my wife while we were sitting on the couch together and she loved it. With her enthusiastic response I knew I had to get to work immediately and channel her positive energy and mine into a good piece of work. I spent a couple of weeks in my home studio, arranging and rehearsing all the parts and then it was heave-ho: I packed up the necessary instruments and gear and moved to the big studio at work where I could get the best sounds possible.
So, before we go any further, let’s take a listen to the finished track.

THE SMILE IN HER EYES
© ℗ 2017 Robert C. Womack
I started capturing this song by creating the drum parts. I'll just go ahead and admit that I've never liked working over a metronome. Instead I have found that playing over drums really motivates me so I start a solo project like this by creating the drum parts. I guess I should also mention that I don’t like canned drums because they just seem to have no soul. In order to get some feel into the drum, I “played” the drums: I set the click track on my workstation template to the tempo, mounted an old, inexpensive ElectroVoice RE-15 dynamic mic over the elbow pad of the mixing console, donned a pair of headphones, and tapped out the parts by hand.

ElectroVoice RE-15 Pic courtesy Coutant.org
I started by recording taps for the kick and snare and I split their beats to two tracks. I will also admit that I am not the world’s most metronomic soul so there were some beats that needed to be corrected via editing. The moment I got the basic kick and snare beats in place I used the Drumagog plug-in to replace the drab sound of my tapping with real drum sounds in order to help get me in the mood. Then I recorded a scratch acoustic rhythm guitar track using the same dynamic mic and a Taylor guitar to help me navigate and set visual cue points (first verse, first chorus, etc.) in the timeline. I also added scratch acoustic versions of the signature lead figure at the head, tail, and first lead slot, and performed a scratch version of the second lead. Might as well really get in the mood, no? From there I built-out the drums from front to back, adding fills and cymbal splashes where needed for the song's changes. There’s a bit of manipulation involved: for example the hi-hat can be articulated as if you were riding the pedal by adjusting a fader within Drumagog. I used the DAW's automation to control the fader and thus the location of the hi-hat pedal so that my hi-hat opened and closed appropriately like a human drummer would manipulate it. Obviously it took some imagination to do all this because the drums were emphasizing guitar parts that weren’t yet recorded, but over time I’ve gotten used to this process. I can always go back in and adapt as the other tracks are recorded.
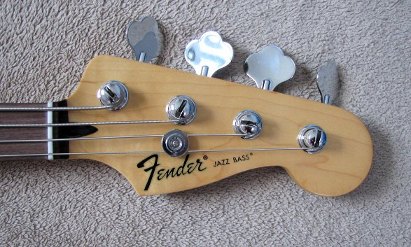
The next step was to record the bass parts. I played a Fender Jazz Bass with the front and back pickups blended and plugged it through an Avalon tube preamp that offers a nice, smooth tube compressor. I set the compressor to perform about three db of compression to give the bass consistency. I played the bass part as a single-pass performance to give it that human mojo. Once the bass was recorded I added a Universal Audio 1176 compressor plug-in and adjusted that to get a full, sustained bass sound going. The final touch was adding a bit of Waves Renaissance Bass plug-in that blended in a tiny bit of sub-harmonic synthesis. When it is used gently, the audible effect of this plug-in is to increase the presence of the bass without adding a bunch of volume.
Next I moved to keyboards. In this case I had decided on a Hammond B-3 organ sound to serve as “gravy” to glue the song together. I played these parts via the Roland guitar synth. I would have put these parts in as single passes as well but the Roland system has a reaction lag that makes playing a little uncomfortable and imprecise. I took pressure off myself by giving myself latitude to punch-in and edit. At about this point I began needing some vocal content as an emotional foil for my guitar playing, so I recorded a scratch vocal. Once it was down I quickly edited around on it and threw on some Antares Auto-tune and reverb so I wasn’t too embarrassed if someone stuck his head in the door of the studio while I worked.
And now I turned to the job of playing the guitar tracks. By this time I had come to the conclusion that the bass needed some definition to cut through the upcoming guitar parts. I took a page from Chris Squire of YES who doubled his bass part with a clean electric guitar for YES's signature song “Roundabout.” In my case I used a G&L S-500 boutique Strat through a nearly clean Fender Deluxe Reverb model with compression on the Line6 POD HD500X. Later in the mix I was able to blend between that guitar line on top and the bass below to give the bass line definition without adding any bass energy. The stringy Strat featured a little bit of funky fret buzz that added character as well. The effect is to have a really cool, full-but-articulated bass to drive the places in the song where the rest of the rhythm section drops out, such as the verses.

It is my usual practice to leave the lead parts until last in order to give myself a little reward after the grunt work of the rhythm parts. But this time I was just too excited about my lead parts to wait, so I dived in. I pretty much fully-developed the lead sounds in the modeler during my rehearsals. Once I got a good through-performance of each part I tripled it. I did this in case I decided the sound wasn’t strong enough by itself or needed some stereo spread during the mix. The signature leads at the head, tail, and middle were performed on the G&L S-500 with its smooth “Dual-Fulcrum Trem” through the clean Fender Deluxe Reverb model with compression. I wanted it to be twangy and sparkly but also strong, and I wanted to use the vibrato to gently wobble the sustained parts. While working out the sound in rehearsal I felt that the S-500 lacked a bit of “oomph,” so I decided to double the track with a Gibson ES-335 set on the bridge pickup. While recording the ES-335, I added a bit more gain on the same amp model that I used for the G&L part. When I sneaked that part in under the Strat part in the mix, the result was exactly what I’d hoped for - more girth. I tried to match the tailpiece trem of the G&L with a little left-hand trem on the hard-tailed ES-335. More on this sound later.
Next it was rhythm guitar time. I went to the chorus passages and played the little call-and-response fills against each of the chorus lines. Once again, the G&L S-500 Strat was the guitar of choice. The song also needed some drive throughout so I added a chugga-chugga rhythm with the gained-up ES-335 and tripled it. It wanted a little development during the chorus passages as well, so I layered two sets of chugga-chugga rhythm parts with the G&L on top and the ES-335 underneath. Why two guitars? The idea is to play the same chords in sync but emphasize the fundamental and third degree of the scale (in this case, on the C chord, it is C and E) on a crunchy humbucker guitar and the third and fifth of the scale (in this case E and G) on a clean single-coil guitar. You end up with an apparent single sound featuring a solid, crunchy bottom and a clean, sparkling, articulated top. Nice! Finally, the last verse needed some development, some little touch to pull the listener through to the end. I added an arpeggiated fingerstyle pattern on the eighth notes of the chords with the ES-335 played through the clean Deluxe Reverb model. Once again I played the part three times but this time did it to create some chime. I panned the three parts with one part centered and the other two panned a little outboard. I don’t know why but I was really tickled by the amount of chime I was able to get by just rolling open the tone control of the ES-335 bridge pickup and tripling the part. I played most of these parts straight through without punch-ins or edits.
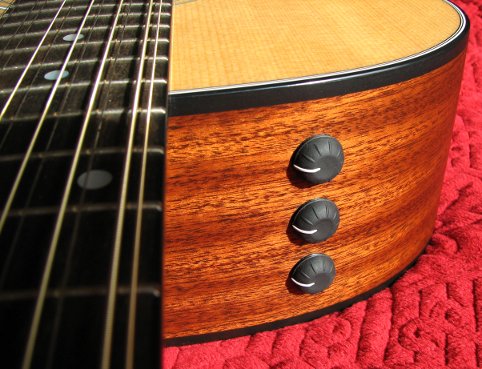
The final piece of the guitar recording jigsaw was to re-perform the scratch acoustic rhythm guide parts. I knew that I would be rolling off a good chunk of the lows and mids in the acoustic guitar sound to make it sit right in the mix so I wanted the complex top jangle of a twelve-string guitar. A mellow Taylor 354ce worked very nicely. I mic'd it using a pair of AKG C451Bs in the near-coincident array I discussed HERE. Two passes panned outboard with the bottom end rolled out gave me the sound I wanted. I played the twelve-string parts with a clear Gravity Picks Classic pick and those parts turned out to be the only ones that I played with a pick. I played everything else, including the leads, with my fingers.
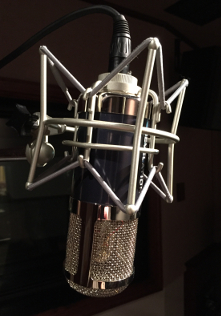
Then it was time for the vocals. I had a several mics to choose from including a 1950s Neumann U-47, several Neumann TLM-170s, some Mojaves, and a very early AKG c414comb. I would have loved to have been able to say I recorded the vocals with the U-47 just for fun but I decided to use my personal MXL Revelation tube condenser mic. I had recently done a comparison between the two and felt really suited my voice well. For the vocal session I set up a music stand for the lyrics and hung the mic inverted above that, right about at eye-level, so I could raise my head and take pressure off my larynx. It had been years since I sang in front of a recording mic so my lovely wife, a classically-trained first soprano, volunteered to help me through the vocal recordings, coaching me and operating the recording transport. It was really rather comical – she coached me on singing and I coached her on transport operation. It worked well and we made a great team. I set up in the medium-live room next to the control room so I could dash in and out of the control room to check the takes. We recorded the vocal as blocks, first the verses and then the choruses. Because the first impression in a song is crucial I’ve learned start somewhere other than the first verse and to go back to it after the performer warms up on other sections. I applied that same method to myself and started out with the second verse. I took my time and took my wife’s excellent advice. Once we got a usable take on each block we would record two more copies of the same section, working on reproducing the emotion while sync’ing with the first take. The point was to be able to blend in the other takes to help my voice if I thought it wasn’t strong enough. But in the end I ran only a single track of my vocal in the verses and muted off the other two. I did, however, fly bits and pieces over from the muted takes to “sweeten” the main take as needed.
For the choruses I had written a three-part vocal harmony. I recorded three takes of each part and used them all. I panned two takes of each part a bit outboard so that when we arrive at the choruses the soundstage opens up horizontally for interest. As a result, we’ve got a contrast happening: there’s simplicity itself with a single vocal line on the verses and then both harmonic and spatial complexity arrive with the choruses. During recording I performed the lead parts, then the high harmony, and then the middle harmony. It is a little-known fact that the middle harmony is the most difficult to do well because the singer must strike a compromise between the lower lead and the high harmony. Don’t ask me why but I just seem to think in this realm and somehow enjoyed performing those parts the most. I also seem to be able to bring more expression to those parts than I can with the others. Interestingly enough, I also zipped right through those parts the quickest, making it a fun way to end the evening of voice recording.
The next morning it was time to start the mix! I say "start," but the truth is that I had been honing the mix as I went along. My clients often want a rough mix after each session so it pays to keep something listenable percolating so I can squirt out a rough at the end of each day. On this song we ended up with forty-three tracks of material to be mixed. The first thing I needed to do was time- and pitch-correct the vocal tracks. The timing was pretty good but there were a few little “S” and “T” sounds that needed to be synchronized in the multi-layer choruses. Then it was time to pitch-correct any mistakes I found in the solo vocal track of the verses. Through experimentation I found that I just wasn’t satisfied with the sound I was getting from Antares Autotune so I decided to try the Waves Tune plug-in for the first time. Surprise! It worked out great, was easy to learn, and took quite a bit less computer processor overhead than AutoTune.
On another front, I’ve noticed something curious about myself: I love the drums, so much so that I run them way too loud during tracking. With powerful amps behind the main monitors they just kick you in the guts and make things exciting. Perhaps I need them loud to keep myself in time while recording but I’ll admit that my frustrated inner drummer also comes out and I end up just pushing them up. Whatever the case, it is something that I have to consciously throttle back as I go along in the mixes. The trail of fourteen numbered mixes I did for this song displays this phenomenon very well as I moderate the drums in at each stage. I can keep some of the impact by using either limiting or parallel limiting.
Now about that signature lead guitar line at the head: at the beginning of working up the mix I accidentally left open my original scratch acoustic lead performance at the head and it blended with the two new electric guitar sounds. After I discovered my mistake and muted the track I found that missed it. It was one of those happy mistakes that happen along the way. So, I unmuted the acoustic and blended it in with the electrics and the lead sound at the head became pretty huge.
The main processing for the vocals was a tiny bit of compression that I performed offline on the clips of the lead vocal track. I also rolled-off some bass to help the vocal sit nicely in the mix. From there I set up a one-point-eight second hall reverb in the RoomWorks plug-in and fed in the vocals via a send and return. I rolled-off the feed to the reverb at 450hz and 4.5khz by ten db via a shelving EQ built into the plug-in and added a pre-delay of fifty milliseconds to space the reverb back from the voice while still allowing the voice to exist in an acoustic space. Normally I organize the mix by bringing the channels into the final mix through subgroups. I'll have one for the drums, one for the rhythm section, one for the lead instruments, and then perhaps lead vocal and background vocal subgroups as well. It makes a raw mix come together quickly because you are only mixing the stems. But in this case I had been honing things as I went along so the basic grove was already happening. I did put the background vocals in a group so that they could all be processed identically. For organization’s sake I placed the tracks into several track folders using the above categories so that I could close all the folders except the folder of items I was working on at a given time, such as guitars, drums, or voices, in order to bring visual calm to the DAW’s display. Each time I exported a new mix I shopped it around onto several sets of monitors, my car stereo, and headphones, tweaking it as I went.

Once I was satisfied with my mix I “focus grouped” it with several trusted engineering and music colleagues for suggestions. Interestingly, one of the early focus groupers, a guy I trust for settling the groove, suggested I push up the guitar that doubled the bass, so I did. Once I applied the results of those auditions I had the final version. I mastered the song for CD and .mp3, burned a disk, and created a label for the CD. That was it! I played the final mix for my lovely wife and presented her with the printed edition and she was extremely pleased. Bravo! That was, after all, the whole point of this project in the first place!

The pic is of my lovely wife on the starboard sponson of the USS Enterprise.
I wrote a companion piece about how I composed "The Smile in Her Eyes" as well. You can find that article, HERE
= =
=