The Amazing Echoplex
...stalking and playing a classic guitar effect
(Thanks to Cameron Schmitz for use of his pic.)
My Experiences With the Echoplex (Skip to Technical Notes)
Over the years, one of the few items of gear in my electric guitar rig that I've most regretted selling was my early-'70s solid-state Echoplex EP-3 tape echo unit. In 1978, I bought it used for peanuts at a little mom and pop country music guitar store in Maryville, Tennessee. Being a recording engineer and trained in all things tape, I was able to keep it in tip-top shape and make it sound marvelous. I loved it every day I owned it, right through the day I sold it. Operationally, the Echoplex is about as simple a piece of gear as could be devised in its time. It has only three controls: "Echo Volume," "Echo Sustain" (repeats), and "Delay Time." From there, operation was just interacting with its superior sound and "playing" the thing. The beauty of the 'Plex was its sound, a really smooth, organic sound that lends an interesting interactive feel to the player. Nevertheless, in 1998 I gave in to advice and pressure from fellow players that "everyone has gone to digital and analog delays and the Echoplex is big, heavy, and is both mechanically and electronically noisy." While it was all true, we guitarists later found out that the alternatives had issues of their own, namely sterility, lack of warmth, and a lack of a certain dynamic feel that is hard to put a finger on. But at that time, due to the space needs of my growing family, all my gear was stored in the living room. My stack of backline stuff was BIG, black, and ugly. So, in a fit of the stupids and trying to make things smaller and nicer looking, I bought a digital delay stomp box that had some tape emulation features and sold my Echoplex to a vintage guitar shop, though I still loved it even then. It seemed the thing to do at the time IDIOT! (Slaps forehead)
I was never really sold on that move. I immediately missed my 'Plex's smooth, organic tape echo and the great way the unit made my guitar sound even without the echo going. I missed playing the Echoplex like an instrument. From what I've heard in the intervening years, there really is nothing like a real tape echo for guitar. Many are close but none really seems to get there. But time marches on. After a few years I began to watch the stores on GBase (expensive!) and hoped for another good one but I eventually pretty much gave up. On GBase, a 'Plex in only okay shape costs between $800 and $1000. The same is true for Guitar Center s used department. For some reason, during its heyday, there seemed to be an unspoken ethic: Take care of your guitar and amp but beat your Plex til it bleeds. As a result, there aren't a lot of these floating around that look very good to me. I eventually resigned myself to buy a digital delay with tape emulation such as Pro Guitar Shop s Empress Vintage Modified Super Delay. Everyone says it sounds like a real Echoplex and the demos sound good. These days it seems like everyone is trying to sound like a real Echoplex. Hmmm... There's a lesson in there somewhere. Anyway, since the Empress/PGS units are hand-made in small quantities they are a little hard to get. I got in line for email notification of availability but missed getting one by minutes because of slowness in making up my so-called mind to pull the trigger. My wife thought I was crazy to miss it. Apparently there was just a little reluctance inside me somewhere.
 Meanwhile, while reading several Internet forum discussions on the Echoplex I discovered a post where someone mentioned in passing that he'd seen pretty reasonable prices on Ebay. So, on a lark I searched Echoplex on Ebay. There were a bunch of them and they WERE quite a bit less expensive than the ones at dealers. And then, lo and behold, there in the list appeared the cleanest-looking EP-3 'Plex I'd ever seen, bar none, even back when they were new in the '70s. It looked "clean enough to eat off." It was a late-model unit from around 1978, judging by the apparently original, dated tape cartridge. The only visible flaw was a broken handle, but that could be fixed.
The unit was offered by a guitar shop that showed a 100% positive feedback on 4770 sales and offered a return guarantee. It was offered at an entirely reasonable "Buy it Now" price so I wouldn t have to endure a bidding war. As I sat and stared at the listing, I whistled and muttered, Wow! That is clean. My wife overheard me and asked me to explain. When I told her what I was looking at, she said, "I should never have let you sell your old one. You ve never been happy about that since. Buy it now. BUY IT NOW." One should never go against the advice of one's enabler-in-chief. So I bought it.
I spent five days cooling my jets waiting for the PayPal transaction to complete and another five while the unit was ground shipped. Meanwhile, I researched the unit s history, tape cartridges, reloading, and maintenance, and found a wealth of info on the net. It turns out that at this point, nearly any part you want is available somewhere. There are still people repairing the units. Semi-functional Echoplexes are available for a song and a dance on EBay. You can keep a spare as a hangar queen and pick it for parts. I also found an Echoplex handle from the 1960s sold as "new old stock" and ordered it. I'll be sinking a few pesos into spare cartridges and maintenance supplies, including raw tape, head cleaning swabs, rubber roller cleaner and conditioner, and isopropanol. At that point, the best hub information site for the Echoplex appeared to be Regis Coyne s The Fantastic Echoplex Echo Chamber, now archived on the "Wayback Machine" . Regis offered repair and maintenance tips, model info, parts sources, and history, all in one spot. Excellent site, Regis! We miss you!
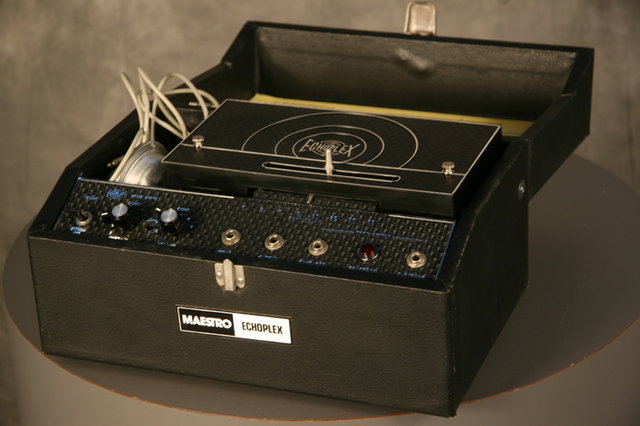
Day 1
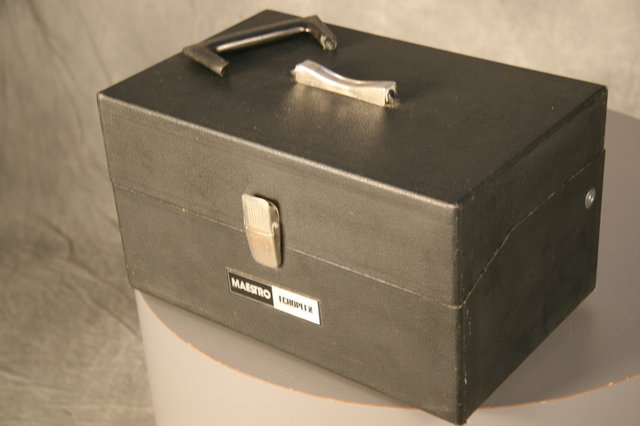
The Plex arrived as scheduled and well-packaged. Cosmetically, this is about as close as you can possibly get to mint. The chrome applique on the control panel is pristine and the instruction sheet glued to the inside of the top is crisp and clean without the usual coffee stains. Its case hardware and tolex are in excellent condition plus. After playing it, I can say that it is truly in near-mint condition with no visible wear on the heads, guides, and rollers. It appears to truly be a closet classic. I can highly recommend the dealer who sold my unit to me, Olivia s Vintage Guitars of Carbondale, IL., whose stated mission is to offer reliable, trustworthy Internet transactions. They certainly accomplished it in this case. There are a few flaws one can expect from a thirty-two year old electro-mechanical device, especially an unused one: The jacks and Echo/Sound-on-Sound switch are a bit dirty and will need to be cleaned up a bit. I will eventually need to replace the electrolytic capacitors in the power supply for signal purity. Nevertheless, I spent an hour and a half playing with it and found that it sounded great. I had successfully stalked and acquired a great unit.
 Day 2
Day 2
Today I got time to sit down with "the beast" and both do the basic tweaks and get familiar again. I outline these adjustments later in this article. Once I got those basic tweaks done everything fell right in place and I was able to start playing and get familiar. At first blush, this unit appears to be in excellent electronic shape because there's a clear sound with plenty of top-end shimmer. Nice.
Application notes:
1. Folks talk about the first repeat off a 'Plex being stronger than those of a digital delay. As I was evaluating the unit, that thought came to mind. It was obvious that the amount of decay between repeats seems to follow a different curve from most of the digital delays I've used. Funny. I ve got a song I wrote a few years ago using the interaction between my guitar and the Echoplex and it has never worked quite right with the digital delays I tried. Itttttt'sss baaaccckk.
2. Now I know what was missing from my routine for all those years when I was sans Plex: I used to store my bottleneck slides and accessories in the cord pocket of the 'Plex. Think about it: Echoplex, picks, capo, and slides, all sit on top of the amp at a gig. Grab everything on top of the amp and stuff it in the 'Plex's pocket before closing up. I'd even put my ring and watch in the pocket as I came onstage. At least they would travel with me to the next venue if I forgot to pull them out afterwards. I've been able to hold on to the same Coricidin bottles since the '70s by that method.
It's good to be home.
Now to a big question: Will or can I rely on a vintage Echoplex for live work and travel? Good question. I m thinking about this one still.
 Day 3
Day 3
Today I brought home some cleaning supplies from the studio and dove into the technical hygiene of the unit. I used Isopropanol (90%) to clean the heads. Very little oxide came off after my one and a half hours of use. The swab came away still mostly white after the cleaning. That's pretty amazing for a thirty-plus year old tape. It also shows that the heads don't have much wear. I used a professional rubber roller cleaner containing Isophorone (Scott Enterprises Rubber Drive Cleaner) on the pinch roller. The pinch roller seemed to be in good shape as well. When using rubber cleaner, wear gloves or wrap your hands in plastic sandwich bags before you remove the lid from the bottle. That stuff smells to high heaven, and the smell will remain on your hands all day. Have a baggie ready to receive the swabs you use as well, and dispose of it in an outside garbage can. The used swabs can stink up an entire room from an indoor trash can. I cleaned the head bridge on which the erase/record head rides and applied a little film of Lubriplate to make it slide easier. As I was dismounting the cartridge and pressure pad, the felt fell off the copper spring. Apparently the glue that held it on had dried out over the years. It will go back on with Superglue. That s another small fix that will be needed.
Day 4
Today the new handle arrived. I used a Dremel with an abrasive cutoff wheel to trim and remove the remaining plastic handle shards from the handle frame. I then very carefully pried up the ends of the handle frame, inserted the new handle, and straightened the handle frame. Back in business.
And now a little history: After five years of experimentation, Mike Battle (an electronics technician) and Don Dixon (a guitarist) came out with their original tube Echoplex in 1961. They took it to Market Electronics, who bought their patent and began manufacturing the Echoplex on a large scale in 1962. Market distributed the Echoplex via Chicago Musical Instruments under the Maestro brand. Battle and Dixon were retained as the design team on the product. Between 1962 and the early 1970s there were three tube models of Echoplex and some cosmetic changes along the way. Towards the end of the 1960s, Market Electronics saw the way of the future and set Battle and Dixon to designing the solid state version. The result was dubbed the EP-3 and made its debut right after Norlin bought out CMI. The EP-3 carried over the control philosophy of the last edition of the EP-2 but added a few more convenience features. Except for the short-run, multichannel EM-1 Groupmaster, the EP-3 was the last model involving Battle. Dixon s input was sought for the design of the next model, the EP-4, with its expanded input section features and LED input meter. Unfortunately there was a production mistake (application of a compressor across the entire signal) that gave the EP-4 a sound that was less desirable to guitarists. The unit can, however, be modified by removing the compressor board and will sound very similar to the EP-3. The EP-4 was offered concurrently with the EP-3 through the second half of the 70s. Both were produced by Market Electronics for Norlin s Maestro brand through 1979, when Maestro was closed down by Norlin. Market Electronics found a new distributor for their products in a Chicago wholesale organization called Harris Teller. Units built for Harris Teller were badged simply Echoplex, eliminating the Maestro name. In 1984, Market Electronics sold the whole of Echoplex production and name to Harris Teller, who took the back stock of parts and assembled reissues of the EP-3, EP-4, and the tube EP-2 (designated the EP-6t in reissue). Those sold from 1985-1991, when Harris Teller brought the analog Echoplex run to an end.
 Day 5
Day 5
Today using suggestions from Regis Coyne s site, I repaired my pressure pad. I used Goo-Gone and a razor blade to carefully clean the dried adhesive from the back of the pad and from the copper spring arm that holds the pressure pad in place. I then used the gel form of superglue to re-adhere the pad to the spring. Tomorrow we play again!
Day 6
All the tweaks and repairs came together today. I spent a couple of hours basking in the sweet sound of the unit, the low noise, rich echoes, and a lovely alternate reality. Now all that's left is a re-capping and cleaning the "Echo/Sound on Sound" switch.
And Futhermore...
I ordered a brace of tape cartridges filled with new tape and new pressure pads and they've arrived. Meanwhile, since I snagged this unit, the supply of 'Plexes, parts, and cartridges on EBay has dried up. Apparently it comes and goes like anything else. I also sprung for a reproduction of a vintage Echoplex T-Shirt. Huzzah!!!
Notes From Two Weeks: All the hype is true about that elusive quality of sound from the Echoplex. When run clean into a Fender Deluxe or Marshall JTM 45 for that glassy sound, it is just plain old beautiful. Perhaps the indefinable part is the complexity of the interplay of the various analog flaws: a little wow and flutter here, a little bandwidth reduction there. Another thing that strikes me is that the unit is much quieter, both mechanically and electronically, than I remembered it. At normal operating levels the Echoplex adds so little tape noise that it is really negligible. At the same time, I'm still trying to get a handle on pre-amplifier echo added to amp distortion sounds. I've become so used to post-distortion echo (as in the studoio) I may have to restructure my pedal rig and experiment.
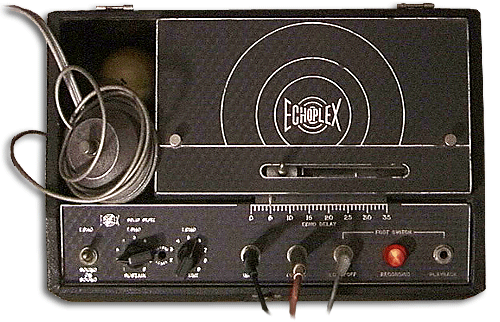
ECHOPLEX THEORY OF OPERATION
The Echoplex Transport
Mechanical
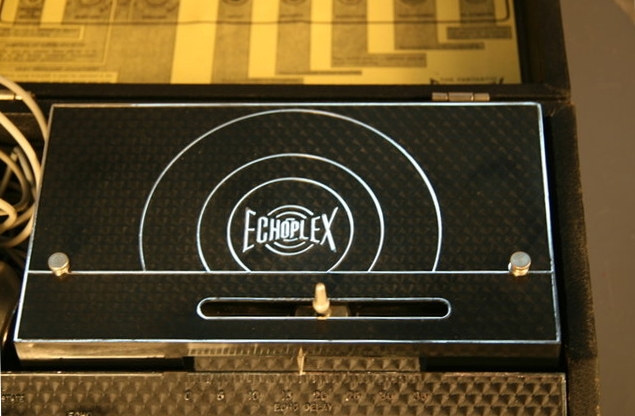
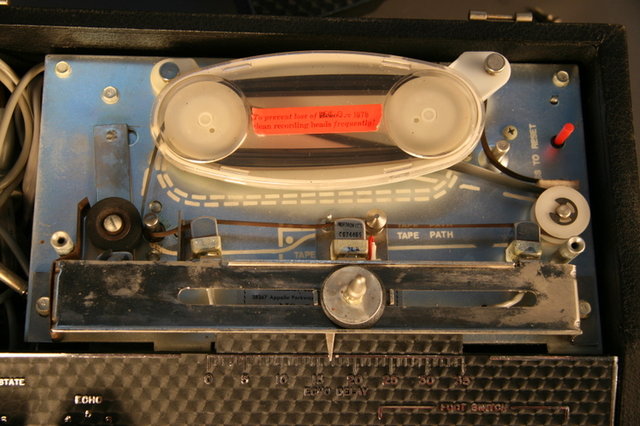
The endless tape loop is housed in the white cartridge in the photo above. The tape is a special self-lubricated formula and is wound in the cartridge with the oxide facing out. This approximately seventy-five foot tape travels clockwise around both the cartridge and tape deck. It exits the inside of the loop through the diagonal slit in the cartridge (under the orange label above) and heads into the white plastic reversing idler wheel on the right. Via the reversing idler, it changes direction by about 340 degrees and heads into the head stack. Holdback tension is maintained by the felt pad riding on the copper spring that presses against the tape at the top of the reversing idler. The holdback tension holds the tape against the heads. The three heads are in contact with the tape across the bottom of the picture, and we'll discuss their functions in a minute. At the left of the heads is the metal capstan. The tape winds around it approximately 100 degrees and heads back towards the cartridge. When the unit's power is turned on, the rubber pinch roller is drawn into contact with the tape against the capstan by a solenoid, pinching it against the capstan. Turned by a large AC induction motor that makes up a large part of the weight of the unit, the capstan pulls the tape out of the cartridge and through the head stack. As the tape exits the capstan, it is drawn into a slit in the left of the cartridge and is wound back onto the outside of the loop. The two bobbins keep the loop loosly formed as the tape moves from the outside to the inside of the pack and the exit, thus completing its cycle.
 Electronic
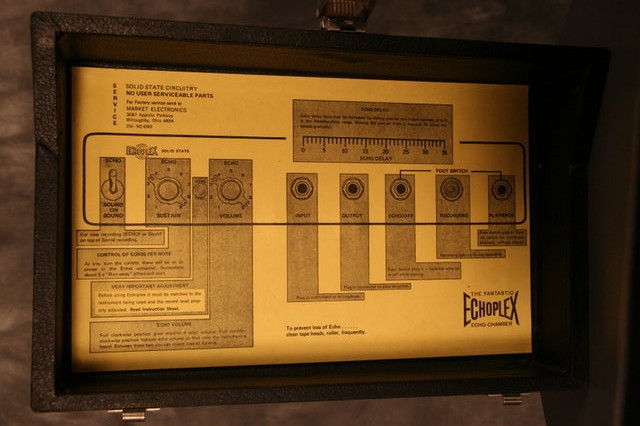
There are two head systems that support the two modes in the Echoplex. The switch on the far left chooses between "Echo" and "Sound on Sound" modes. First, the echo system. Echo is accomplished by recording the guitar's signal on to the tape and playing it back. The tape playback signal is mixed with the with the original guitar signal and Voile'! echo. The "Echo Volume" control blends the output of the record head with the guitar signal. In the Echoplex, the delay time is set by moving the record head closer to and further away from the playback head. The further away the two are, the longer the delay time. So far, our description gives you one echo. In order to get more than one repeat, the output of the playback head is mixed with the original signal and fed back into the record head. The "Echo Sustain" control varies how much of the playback signal is fed back to the record head.
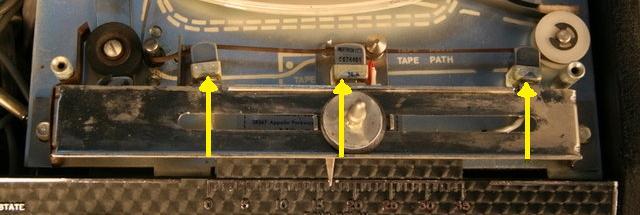 So, looking at the picture, we see three heads in contact with the tape across the bottom. The center head, with what looks like a big wheel below it, is a combined record and erase head. The tape goes by the erase head section and any previous signal is erased from it. It then goes by the record section of the same head where a new copy of the guitar is recorded onto it. From that head the tape moves to the echo playback head on the left, where the recorded signal is played back, mixed with the original signal, and sent to the output. Remember that the delay time is set by the distance between the record and playback heads. The spike in the middle of the "wheel" below the record head is the handle that allows you to move the record head back and forth along the bridge and thus vary the delay length. The handle protrudes through the tape system cover and the attached pointer protrudes through the front and points at a scale that allows you to remember and reproduce delay time settings.
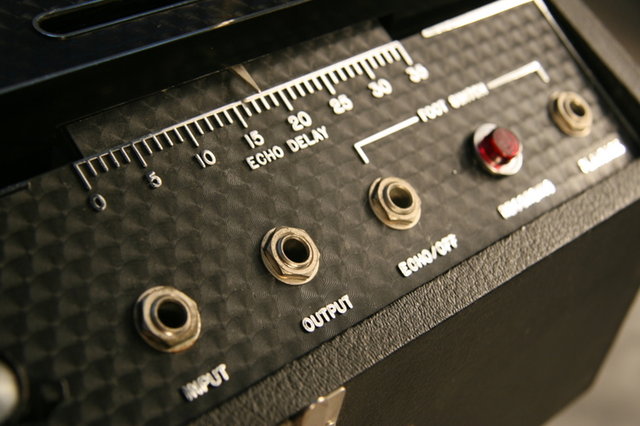
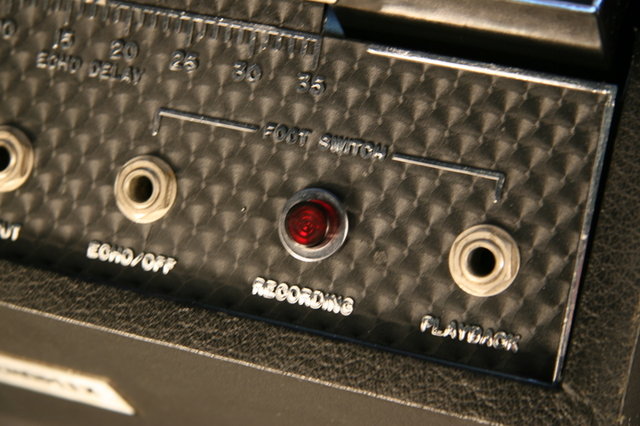 The "Echo Volume" control has the ability to blend original and echo signals and achieve a mix anywhere from pure original signal to wholly delayed signal. The "Echo Sustain" control has enough gain to allow you raise the volume of the delay signal fed back into the record head enough for the echoes to "run away" or actually increase in volume. It is my understanding that the extra gain was originally provided to allow you to keep up with the diminishing sensitivity of the heads as they wear. The runaway effect was just a pleasant side-effect. In the Echo mode, a footswitch inserted into the left-hand "Echo/Off" jack will allow you to switch the echo signal on or off. This is '70s technology, so there are no echo "tails" when the signal is switched off.
Now let's switch the system to "Sound on Sound" mode. In this mode, the erase portion of the erase/record head is turned off as well as the left-hand playback head, and the far-right playback head is switched on. As a result, the signal is recorded on the tape and the tape must then travel all the way through the cartridge loop before it returns to the right-hand playback head and is played back. The tape is about two minutes long so the loop returns in about... uh... two minutes. Because erase head is switched off, you can play along with the recorded loop and your second performance will be added to the first and show up again when the tape comes back around. In this mode, a footswitch inserted into the "Playback" jack allows you to alternate between recording and playing back and playback-only. The red "Recording" light will light up when you are recording.
Notes on typical tweaks needed on a vintage machine:
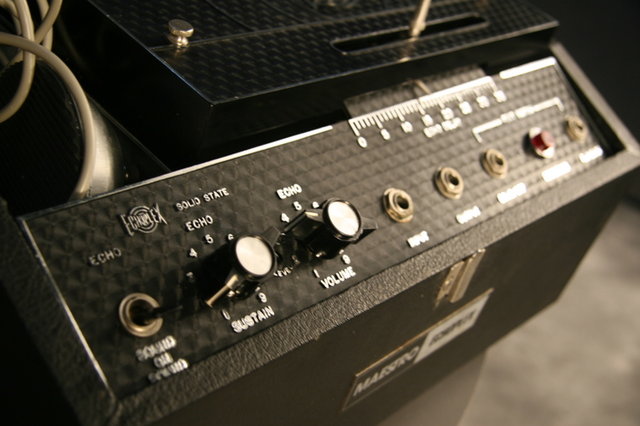
1. On first contact with a machine, check the mechanical calibration of the two main knob pointers and adjust if necessary. Every EP-3 I've encountered has had at least one knob out of whack, usually the right one ("Echo Volume"). Because there is no key-way on the right knob's smooth shaft, the knob loosens up and drifts. Make sure it swings from where "0" would be (below "1" on the left) to "9" on the right. If not, loosen the set screw and set it right. It is hard to wrap your head around the knob settings and work from any memories you have if the pointers are all weird.
2. This one is important: Always set the "Record Level" control per the instructions. That's the little screw control recessed in the hole between the "Echo Sustain" and "Echo Volume" control knobs. It's the only way to win the signal to noise battle. If a low signal is recorded on the tape, the "Echo Volume" (playback level) control must be jacked way up to get a good mix. The variable available to us is the Record Level, which establishes the level of the audio signal recorded above the tape noise, which is a constant. Because tape noise IS a constant, the higher the printed signal, the lower the "Echo Volume" control, and thus the noise floor, can be set. More signal means less noise. As delivered, my unit seemed to be a little noisy. I found the "Record Level" was pretty low, requiring me to jack up the Echo Volume and thus the tape hiss, until I set it properly. My first little tweak was rewarded by a "CRUNCH" sound and a jump in the audio level - the pot needed exercise after being stored so long. I exercised it back and forth, and then went on. Here's how you adjust the unit: Begin by cleaning the heads. Set Echo Sustain at "0" to get one repeat. Now, using the "Record Level" control, you want the volumes to match when the "Echo Volume" control is at its far left (dry) position and far right (echo only) position. Voile'! The unit is optimized. The levels should be equal when the control is at twelve o'clock. Enjoy!!!
For more info on delays and how they work, go HERE .
UPDATE:
I forgot one little customization that I typically do with an Echoplex EP-3: If you've ever used one you'll notice that the front panel is free-floating at the front edge and only supported at the back edge. As a result, the panel flexes a bunch when you insert a cable, and that makes me uncomfortable. Just for my own comfort, or perhaps to lengthen the unit's life, I like to support that front edge. To do this, I first measure the inside wall of the case from the front lip down to the top edge of the panel. Next I remove the mechanism from the case and measure the depth of the front panel at the front lip, both plastic plate and metal structure and I add those two measurements together to give me the offset from the top edge of the case to the bottom edge of the control panel. Next I measure the depth of the case at the front and subtract the sum of those first two measurements from the total depth to tell me how tall my supports will need to be. I cut two pieces of quarter-round molding and glue one of them into the case at each front corner with Titebond. The result is a much more stable and solid control panel.

UPDATE 2:
Here's an interesting photo:

Take a look at this unit, one of Queen guitarist Brian May's modified Echoplexes. The unit has been extensively modified but the most visually striking mods are the addition of the double-length record head rail and a double-length case which has been fabricated to house it. Thanks to Mark Reynolds for finding the photo!
Update 3, 3/16/2018 Go under the hood of an Echoplex with a shade tree mechanic (me) to replace its drive belt, HERE.

Update 4, 12/11/2024 I've been loath to beat up my pristine Echoplex by dragging it around to gigs and sessions, so in the intervening years I've been looking for a modern unit that I can freely transport. I've finally found a suitable stand-in: the excellent Catalinbread Belle Epoch Deluxe echo unit. Designer Howard Gee actually reproduced the Echoplex EP-3 preamp on a component level to give this unit its sound. You can read of my discovery of this unit, HERE.
= =
=