The Musician's Room: Recording Guitar


ACOUSTIC GUITAR:
Most guitarists will tell you that instrument choice is a very subjective and personal choice. Most engineers will tell you that mic placement and choice are just the same. With that said, understand that the following are my own opinions and generalizations. Your mileage may vary. Does not include tax and license, dealer prep and options, destination, service charges, or undercoating.

I'll approach this as if I'm recording a guitar solo intro leading into an ensemble pop song.

Mic'ing:
If you've been using dynamic mics, the best way to describe what you'd get is "just missing something" (dynamic range and frequency response).

As a starting point, try to use a large-diaphragm condensor if you can. The Neuman TLM-170 and TLM-103 are very nice and balanced. If you want an upper-mid push for chinka-chinka rhythm playing, go for the Neuman U-47, or U-87, both of which have this built in. In general, smaller diaphragm mics such as the Neuman KM-84/KM-184, AKG 451/461, or Shure SM-81 will also give you a reasonable sound and will also tend to add "sparkle" and brightness. Of these, the KM-84/KM-184 is the smoothest and is very pretty sounding for this application.

*NEW* For home recording, Marshall Mics make a really nice and inexpensive alternative to the TLM170s. Go "HERE" to see my review.

Mic Location:
Personally, I avoid the soundhole. Period. It's too boomy for me. My first placement (in a good room) is usually at the point where the neck meets the body, 6-10 inches out, aimed at the fretboard. If that yields too much fret noise, I can move out or down toward the soundhole a little at a time. To mellow things out, I may aim right behind/below the bridge at the treble side of the front of the guitar. If I have the tracks, I'll throw up an ambient pair, maybe 6-10 feet away, facing away and print them on another pair of tracks.

If I'm in an absolute track glut or need a more solid bass, I'll print the guitar's pickup to a track as well. You can always mix all these tracks down and bounce the mix to a pair of tracks in order to make space.

Spacial:
You can place one mic at the neck joint position and the other at the behind/below bridge position and pan them outboard, but the EQ differences may bother you.

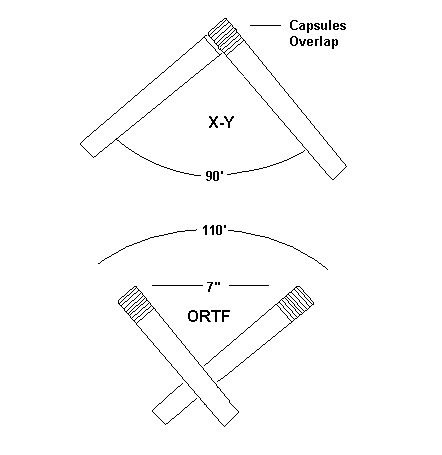
You can place a co-incident or near co-incident stereo pair of mics at one of the previously mentioned locations to get a spread across the speakers. A typical conservative starting placement for a coincident pair is set up with the capsules overlapped and pointed at ninety degrees from each other.

A typical starting point for a coincident, ambient pair is with the mic capsules overlapped and at ninety degrees and the pair about six to ten feet out.


Use the ambient pair to spread the sound and add room reflections during the solo passages. You can pull the pair back in the mix during ensemble passages.

Try panning the pickup to one side and the mic to the other.

Effects:
For a realistic guitar sound, typically I'll just add a little reverb. You can go with a room reflections program for a warm, intimate feel, or a small, baroque hall for a larger setting. Experiment!

You can use a little chorus but be very sparing if you want to remain realistic. This effect has been a bit over-used and is becoming passe'.

Home acoustic stuff:
If your home is too "live" and you end up with too much room ambience (and it is bad ambience), here are a couple of tips:

1. Place yourself in the middle of your largest room to distance yourself from wall reflections. If you have a room with a cathedral ceiling, you're in luck! Hopefully, the room is carpeted or has a rug. If not, try temporarily moving one in to kill floor reflections.

2. Create a "gobo", an acoustic shield. Using heavy quilts and mic stands (or any suitable structure), create a two-sided structure in the shape of a "V" when looked at from above, and chest-height when standing. Set up your playing position facing the inside of the apex of the V. Use cardioid mics.


RECORDING AMPS:
First determine what kind of sound you want and determine which speaker is cleanest in the box. We'll use a Shure SM-57 as our main mic. For a tight sound, start with the mic about six inches out from the speaker. For a bright, sharp sound, place the mic at the center of the speaker. Some people even run the mic in 'till it touches the speakers cloth. For a smoother sound, work your way outward on the radius of the cone. A decent, balanced sound can often be obtained about two-thirds of the way out.

For an in-between sound, place the amp on a reflective floor and the mic about three feet out and facing towards the floor, but on a tangent from the speaker. The idea here is like a bumper shot in pool: Anticipate where a direct beam of sound would bounce to and put the mic on-axis there.

To kill off some of the insect-attracting overtones from a distorted sound, back off the mic to around four to ten feet and allow the air to attenuate the high-end a little.

For an ambient sound, there are more options. You can get a really ambient sound by placing the amp in a "wet" room like a bathroom and mic'ing from the opposite corner of the room. To emphasize the ambience, face the mic away from the amp.

For a nice balance between bright and ambient, tight-mic the amp and ambient-mic the amp (using a wide-bandwidth condensor mic) and mix the two mic signals.

"That Seventies sound"

==